# Creating a blog using Contentful
[Contentful](https://www.contentful.com/) is a headless content management system (CMS) that can be used to create, manage, and publish content on any digital channel.
In this tutorial, you'll create a blog with commercetools Frontend using content from a Contentful account.
If the `content-contentful` extension is not available in your commercetools Frontend project at this path `packages/PROJECT_NAME/backend`, before proceeding with the following steps, you must:
1. Copy the `content-contentful` extension from [the scaffold repository](https://github.com/FrontasticGmbH/scaffold-b2c/tree/main/backend/content-contentful) to your project.
2. [Register the extension in your project](/frontend-development/extensions.md#define-extensions).
## Get started
To get started, set the Contentful configuration values and publish a blog post following these steps:
1. [Add the following project configuration fields to the project schema](/frontend-development/api-hub-configuration.md#add-project-configuration-fields-to-the-project-schema) from the Studio.
```json title="Add Contentful project configuration fields"
{
"name": "Contentful Extension",
"fields": [
{
"label": "Space ID",
"field": "EXTENSION_CONTENTFUL_SPACE_ID",
"type": "encrypted",
"translatable": false,
"required": true
},
{
"label": "Preview Token",
"field": "EXTENSION_CONTENTFUL_PREVIEW_TOKEN",
"type": "encrypted",
"translatable": false,
"required": true
},
{
"label": "Access Token",
"field": "EXTENSION_CONTENTFUL_ACCESS_TOKEN",
"type": "encrypted",
"translatable": false,
"required": true
}
]
}
```
2. From the Contentful dashboard, go to **Settings** > **API keys**. Then, copy the `Space ID`, `Preview token`, and `Access token`.
3. [Set the Contentful configuration values](/frontend-development/api-hub-configuration.md#enter-project-configuration-values-in-project-settings) from the Studio.
4. From the Contentful dashboard, go to **Content model** and create a "Blog Post" content model with the following fields:
- `title` - Short text
- `text` - Long text
5. From the Contentful dashboard, go to **Content** and create an entry of type "Blog Post" with the following content. Then, publish the entry.
```txt title="Content of the first blog post"
title: "First blog post",
text: "#First blog post
This is the first blog post ."
```
## Create a blog data source
To fetch blog posts from Contentful and pass the data to the Frontend components, create a data source following these steps:
1. In the Studio, go to **Developer > Data sources** and click **Create schema**.
2. In the **customDataSourceType** field, enter `frontastic/content`.
3. Copy the schema below and paste it into the schema editor, then click **Publish**.
```json title="schema.json"
{
"name": "Single content",
"category": "Content",
"icon": "source",
"schema": [
{
"name": "Content selection",
"fields": [
{
"label": "Content ID",
"field": "contentId",
"type": "text",
"translatable": false
}
]
}
]
}
```
4. In the `backend/content-contentful/index.ts` file, implement the `frontastic/content` data source extension as follows. The `contentId` set in the Studio is used to fetch the blog data from Contentful.
```typescript title="index.ts"
'data-sources': {
'frontastic/content': async (
config: DataSourceConfiguration,
context: DataSourceContext
) => {
const contentApi = new ContentApi(
context.frontasticContext,
getLocale(context.request)
);
return {
dataSourcePayload: await contentApi.getContent(
config.configuration.contentId
),
};
},
},
```
## Create a blog page
To create a blog page in the Studio, you have to:
1. [Create a blog component](/frontend-development/contentful.md#create-a-blog-component).
2. [Create a blog page folder](/frontend-development/contentful.md#create-a-blog-page-folder).
3. [Create a blog page version](/frontend-development/contentful.md#create-a-blog-page-version).
### Create a blog component
To display the data received from the data source in the blog, create a Frontend component following these steps:
1. In the Studio, go to the **Components** and click **Create schema**.
2. In the **tasticType** field, enter `commercetools/ui/content/blog`.
3. Copy the schema below and paste it into the schema editor, then click **Publish and download JSON**.
```json title="schema.json"
{
"name": "commercetools UI content blog",
"category": "Content",
"icon": "favorite",
"schema": [
{
"name": "Configuration",
"fields": [
{
"label": "Data",
"field": "data",
"type": "dataSource",
"dataSourceType": "frontastic/content",
"translatable": true
}
]
}
]
}
```
4. In the `tastics/content/blog/index.tsx` file, implement the React component to render the Markdown content to HTML as follows. This way, you can access the Contentful content in the Frontend component through the `data` property, which is passed to the component at the time of server-side rendering by the `frontastic/content` data source.
```typescript title="index.tsx"
import React from 'react';
import Markdown from 'components/commercetools-ui/content/markdown';
const Blog = ({ data }) => {
const { text } = data.data?.dataSource?.attributes;
return ;
};
export default Blog;
```
5. Register this Frontend component in the `tastics/index.tsx` file.
```typescript title="tastics/index.tsx"
import NotFound from './not-found';
import ContentfulBlog from './content/blog';
export const tastics = {
default: NotFound,
// ... other Frontend components
'commercetools/ui/content/blog': Blog,
};
```
### Create a blog page folder
1. In the Studio, go to **Site builder** then click **New > Create page folder**: the **Page folder settings** dialog opens.
2. In the **General settings** section, enter `Contentful` in the **Page name** field.
3. In the **Data source** section, click **+ Add data source filter** and select **Single Content**: the **Edit data source filter** page opens.
4. In the **Content selection** section, enter the blog "Entry ID" from Contentful in the **Content ID** field and click **Save**. Then, click **Save** in the **Create page folder** dialog.
### Create a blog page version
1. From the page folders list, select the **Contentful** page folder. Then, click **New > Create page version**: the **Create page version** dialog opens.
2. In the **Page version name** field, enter `First blog`. From the **Layout** drop-down, select the desired layout. Then, click **Save**.
3. Click **+** and add a layout element to a section of the page.
4. From the **Components** list, select the **commercetools UI content blog** component and drag it into the layout element.
5. In the **Component settings > Configuration** section, select the **Single content** data source filter.
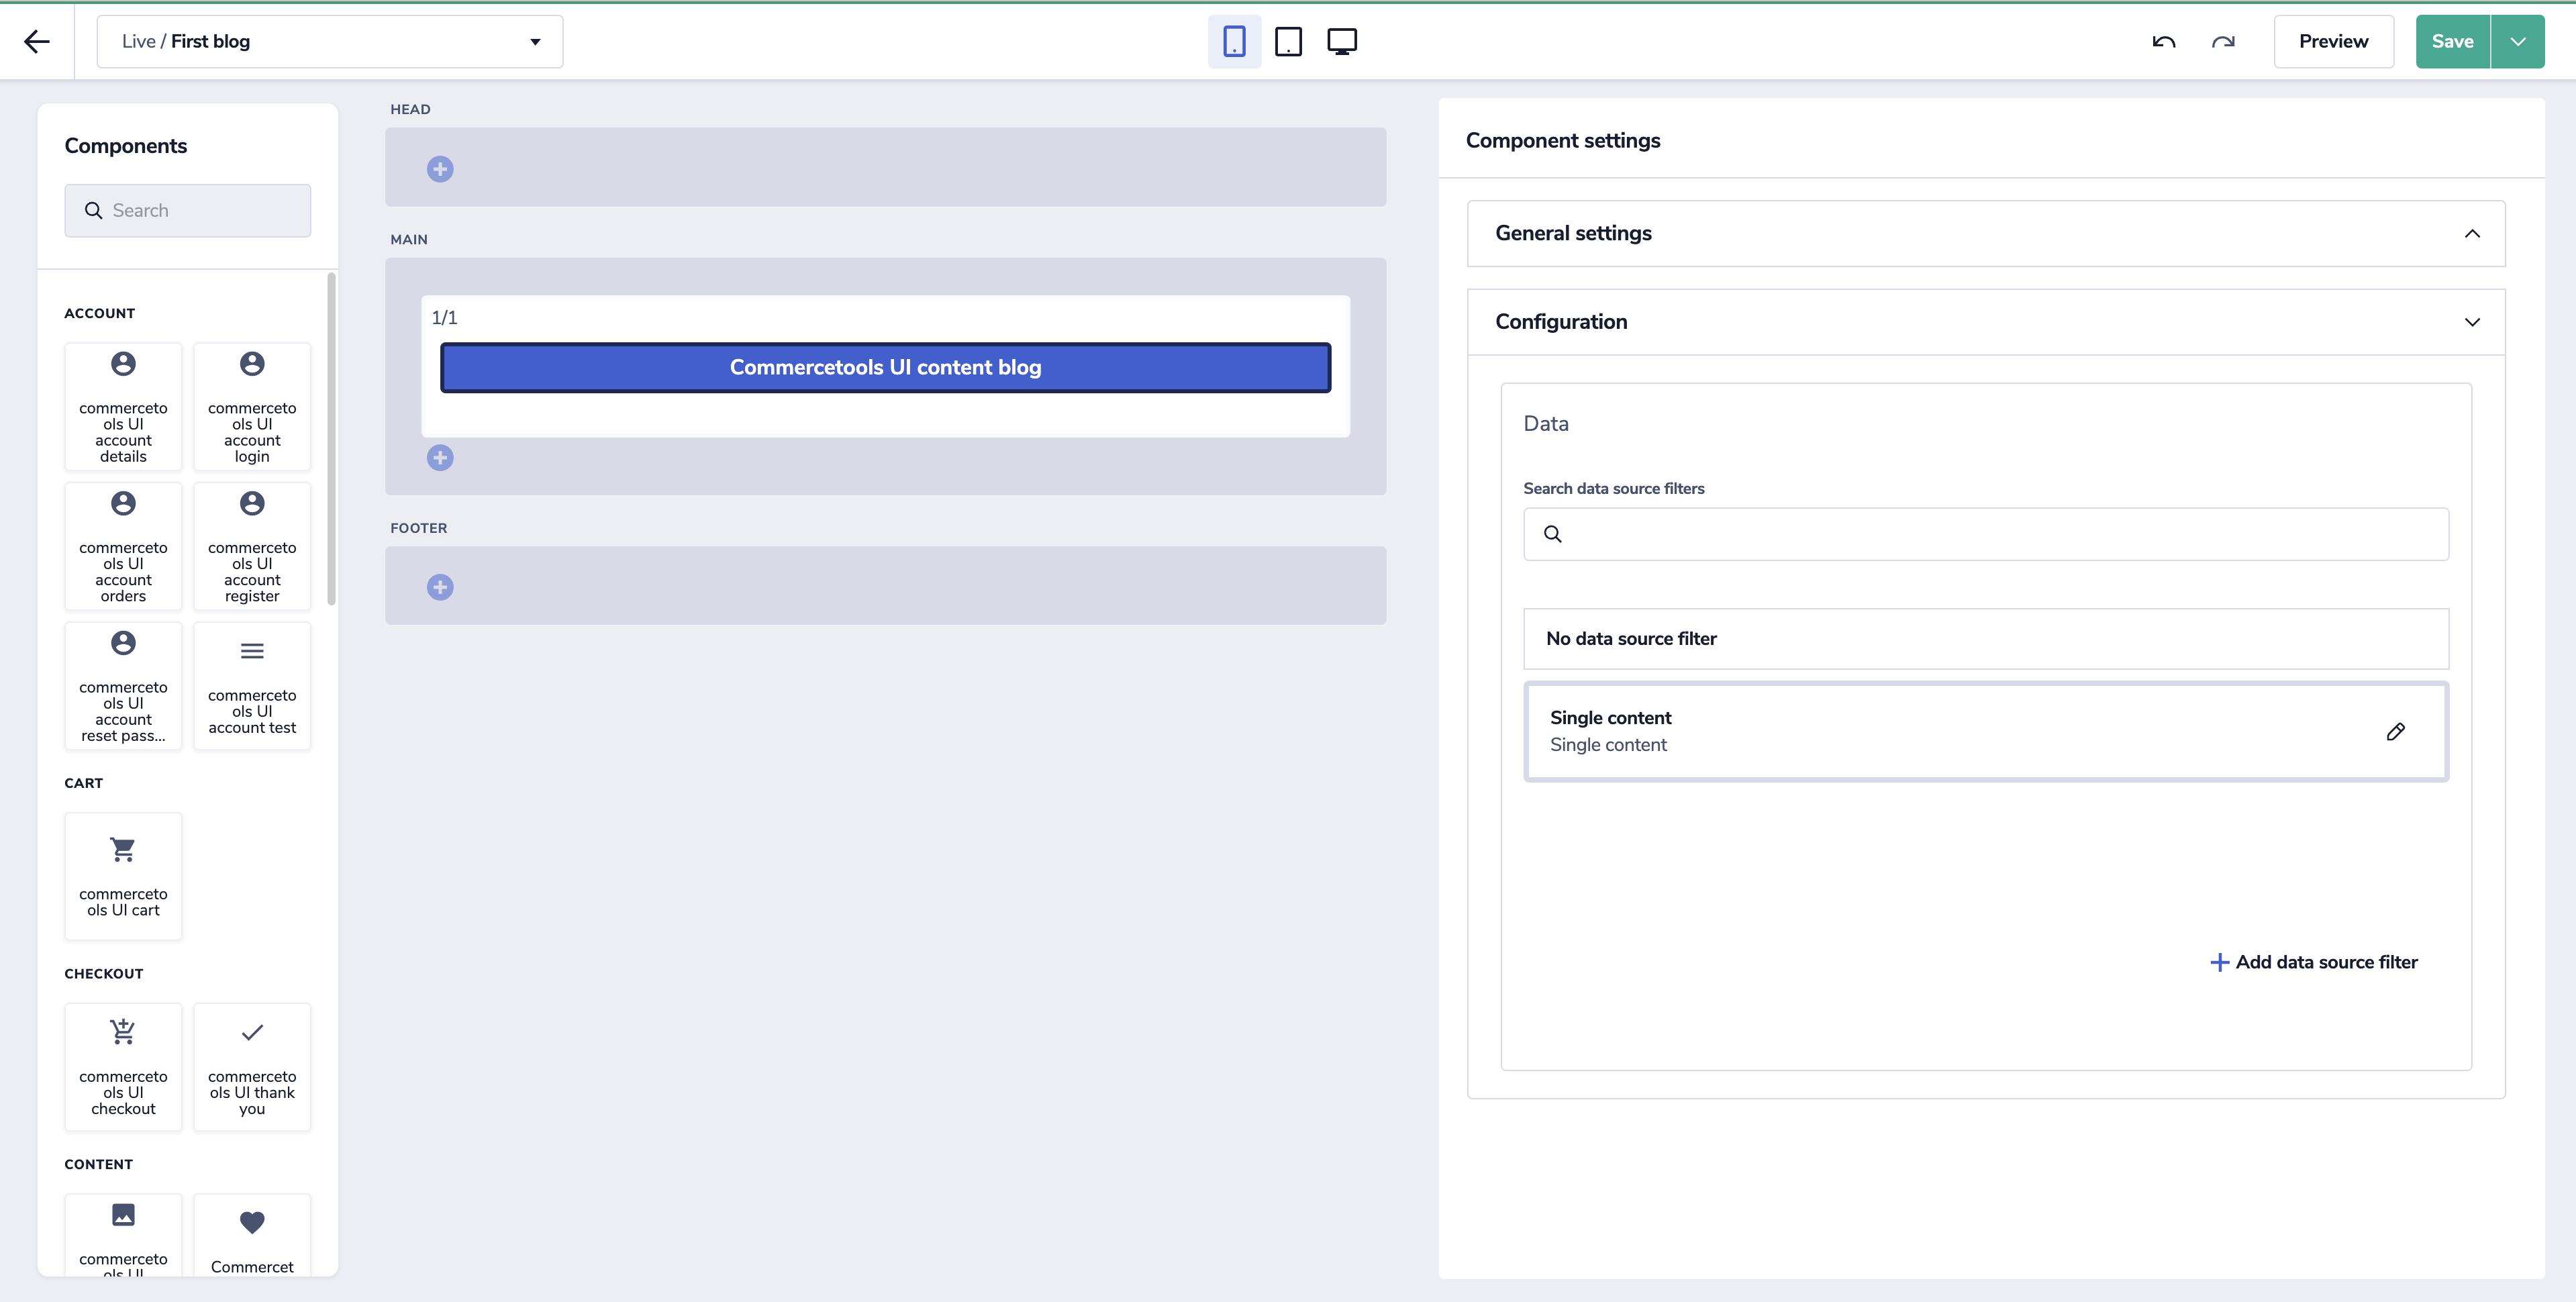
6. To see the preview of the page version, click **Preview**. Then, click **Save** and click the back arrow to go back to **Site builder**.
7. From the page folders list, select the **Contentful** page folder. Then, expand the **Draft** section.
8. Hover on the **First blog** page version, click the **more** icon, and select **Make default**.
9. Open `http://localhost:3000/contentful` in your browser to see the page live.
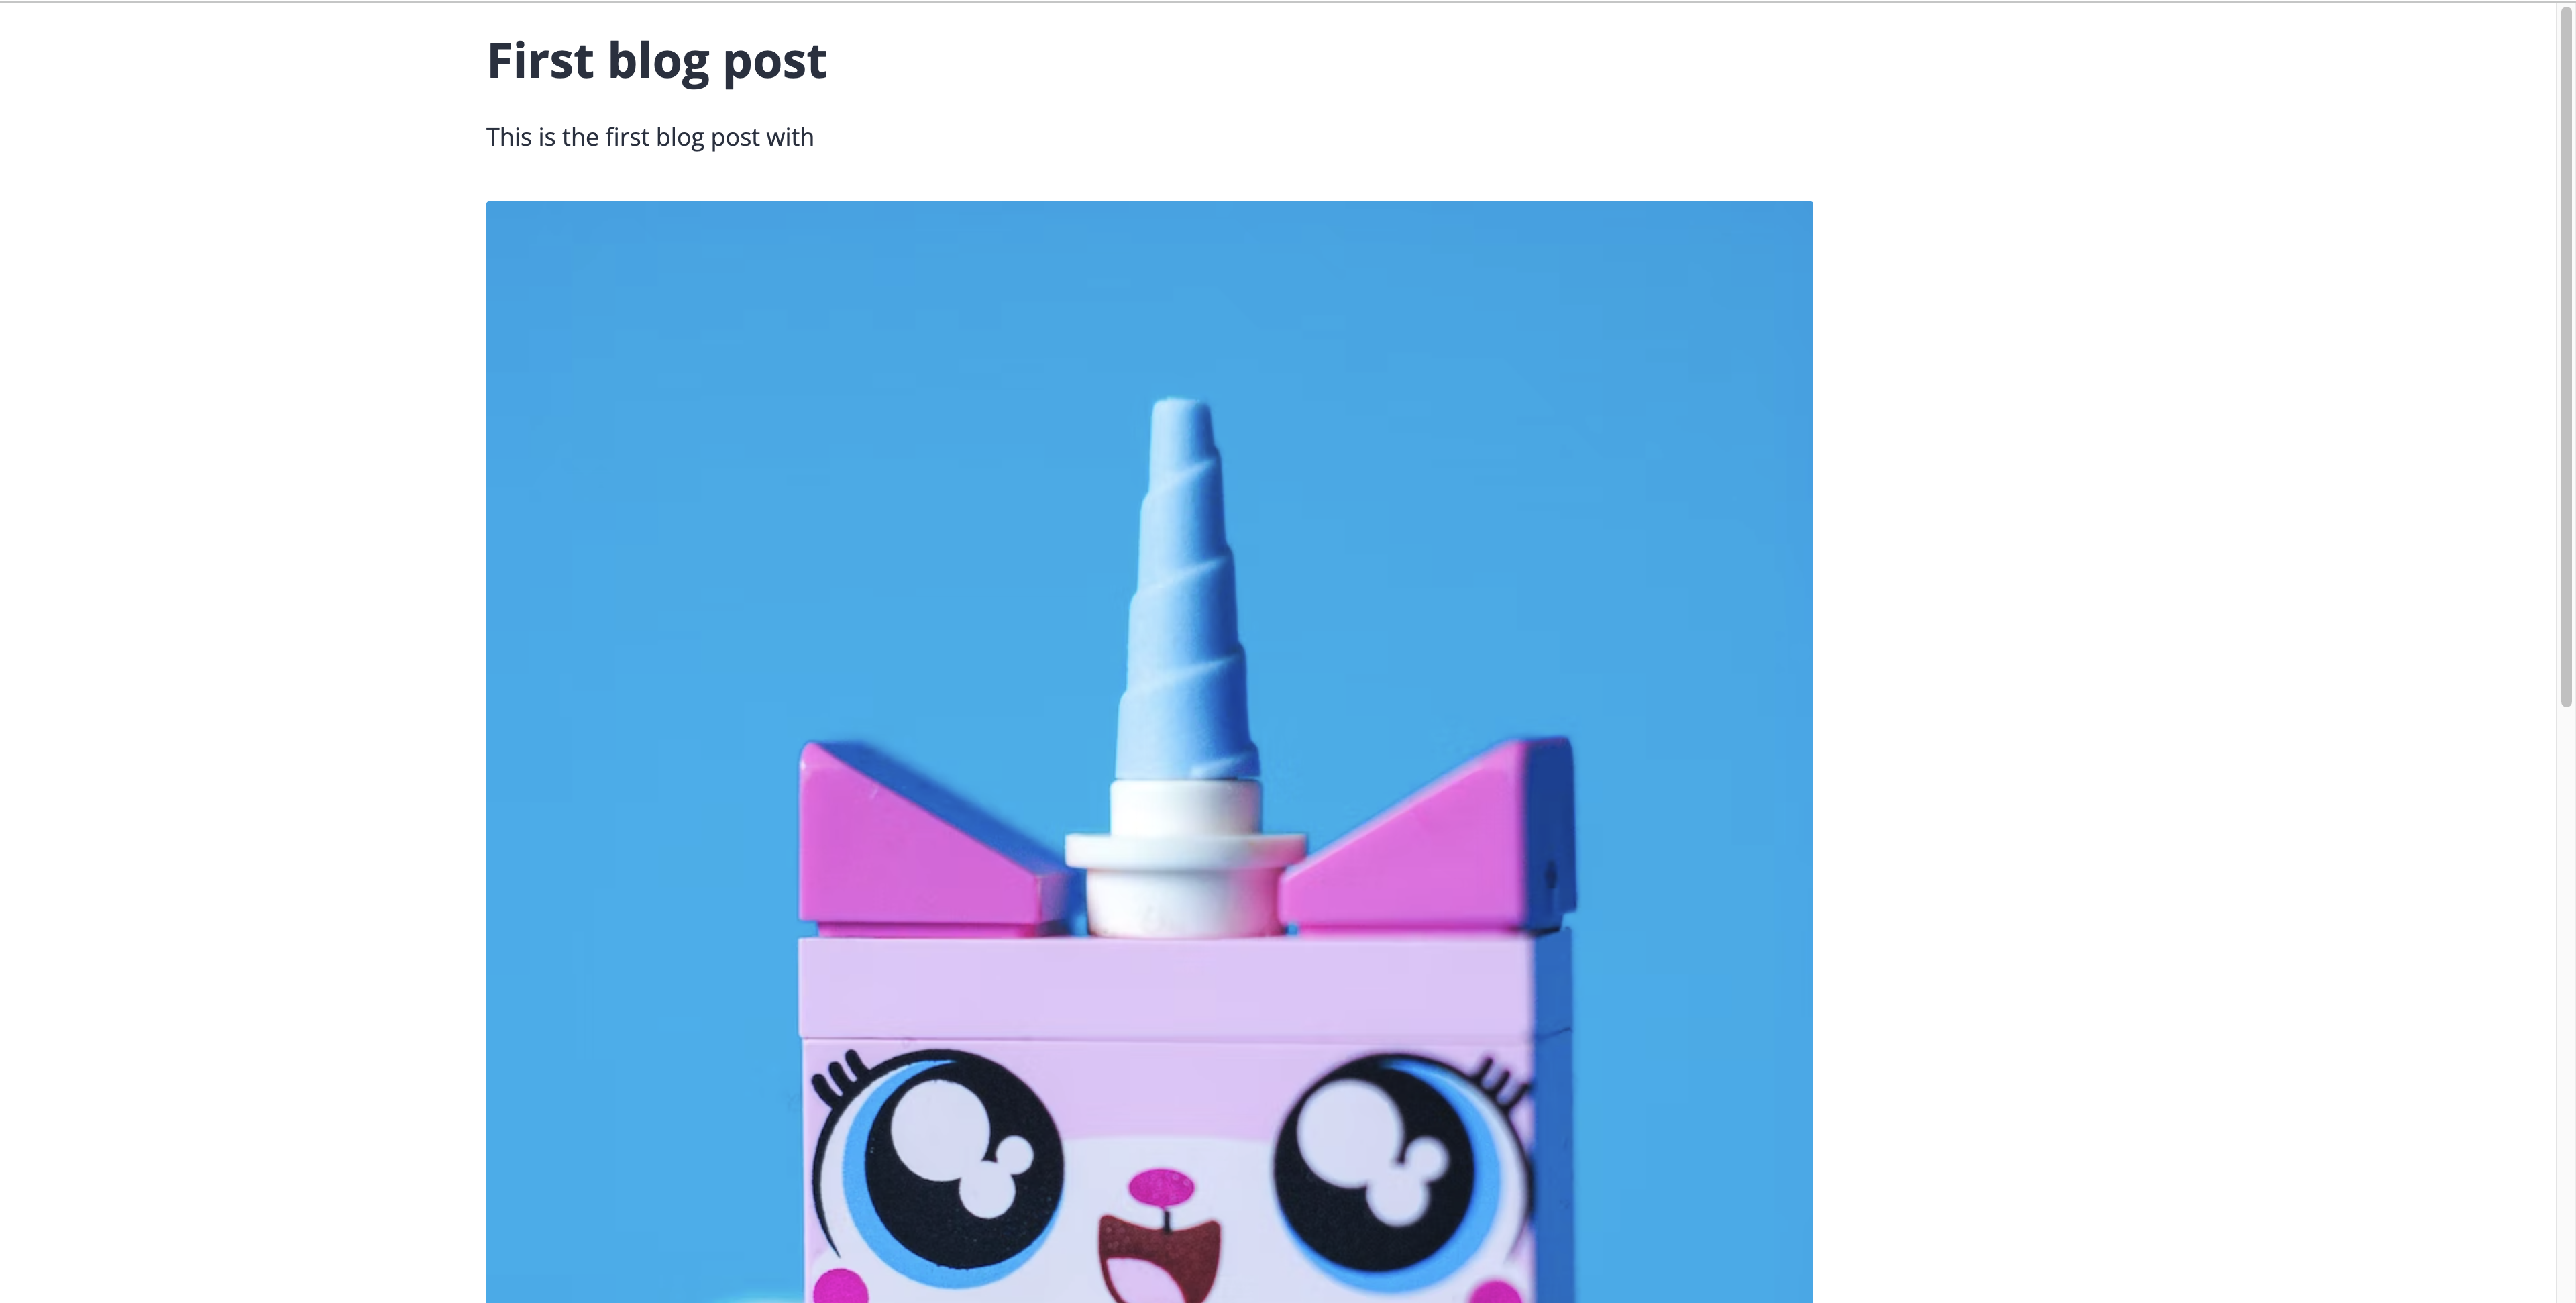
You've successfully built a blog page using the data from Contentful.
However, in a real-world scenario, configuring each page with a different blog "Entry ID" will get tedious and you'd want to render the blog content dynamically based on a URL path. For this, you can use dynamic pages to dynamically render a page based on the requested URL.
In the following sections, you can see how to dynamically render a blog based on the page request URL.
## Create a dynamic blog page
1. In the Studio, go to **Developer > Dynamic pages** and click **Create schema**.
2. In the **dynamicPageType** field, enter `contentful/blog`.
3. Copy the schema below and paste it into the schema editor, then click **Publish**.
```json title="schema.json"
{
"name": "Contentful blog",
"category": "Documentation examples",
"icon": "list",
"dataSourceType": "frontastic/content",
"isMultiple": true
}
```
Providing `dataSourceType` in a dynamic page schema optimizes the fetching of the `dataSourcePayload` at the time of dynamic page resolution. In the [example below](/frontend-development/contentful.md#implement-a-blog-dynamic-page), the `dynamic-page-handler` sends the `dataSourcePayload` for the `frontastic/content` data source. During server-side rendering, the `dataSourcePayload` is passed directly to the components that specify `frontastic/content` as the data source. This saves a network request, making the whole process faster.
4. In the left-hand navigation, click **Dynamic pages**. Then, select the **Contentful blog** dynamic page.
5. Select **Default page** in the **Page rules** section. Then, click **+ New page version**: the **Create page version** dialog opens.
6. In the **Page version name** field, enter `Blog`. From the **Layout** drop-down, select the desired layout. Then, click **Save**.
7. Click **+** and add a layout element to a section of the page.
8. From the **Components** list, select the **Contentful blog** component and drag it into the layout element.
9. In the **Component settings > Configuration** section, select the **frontastic/content** data source filter.
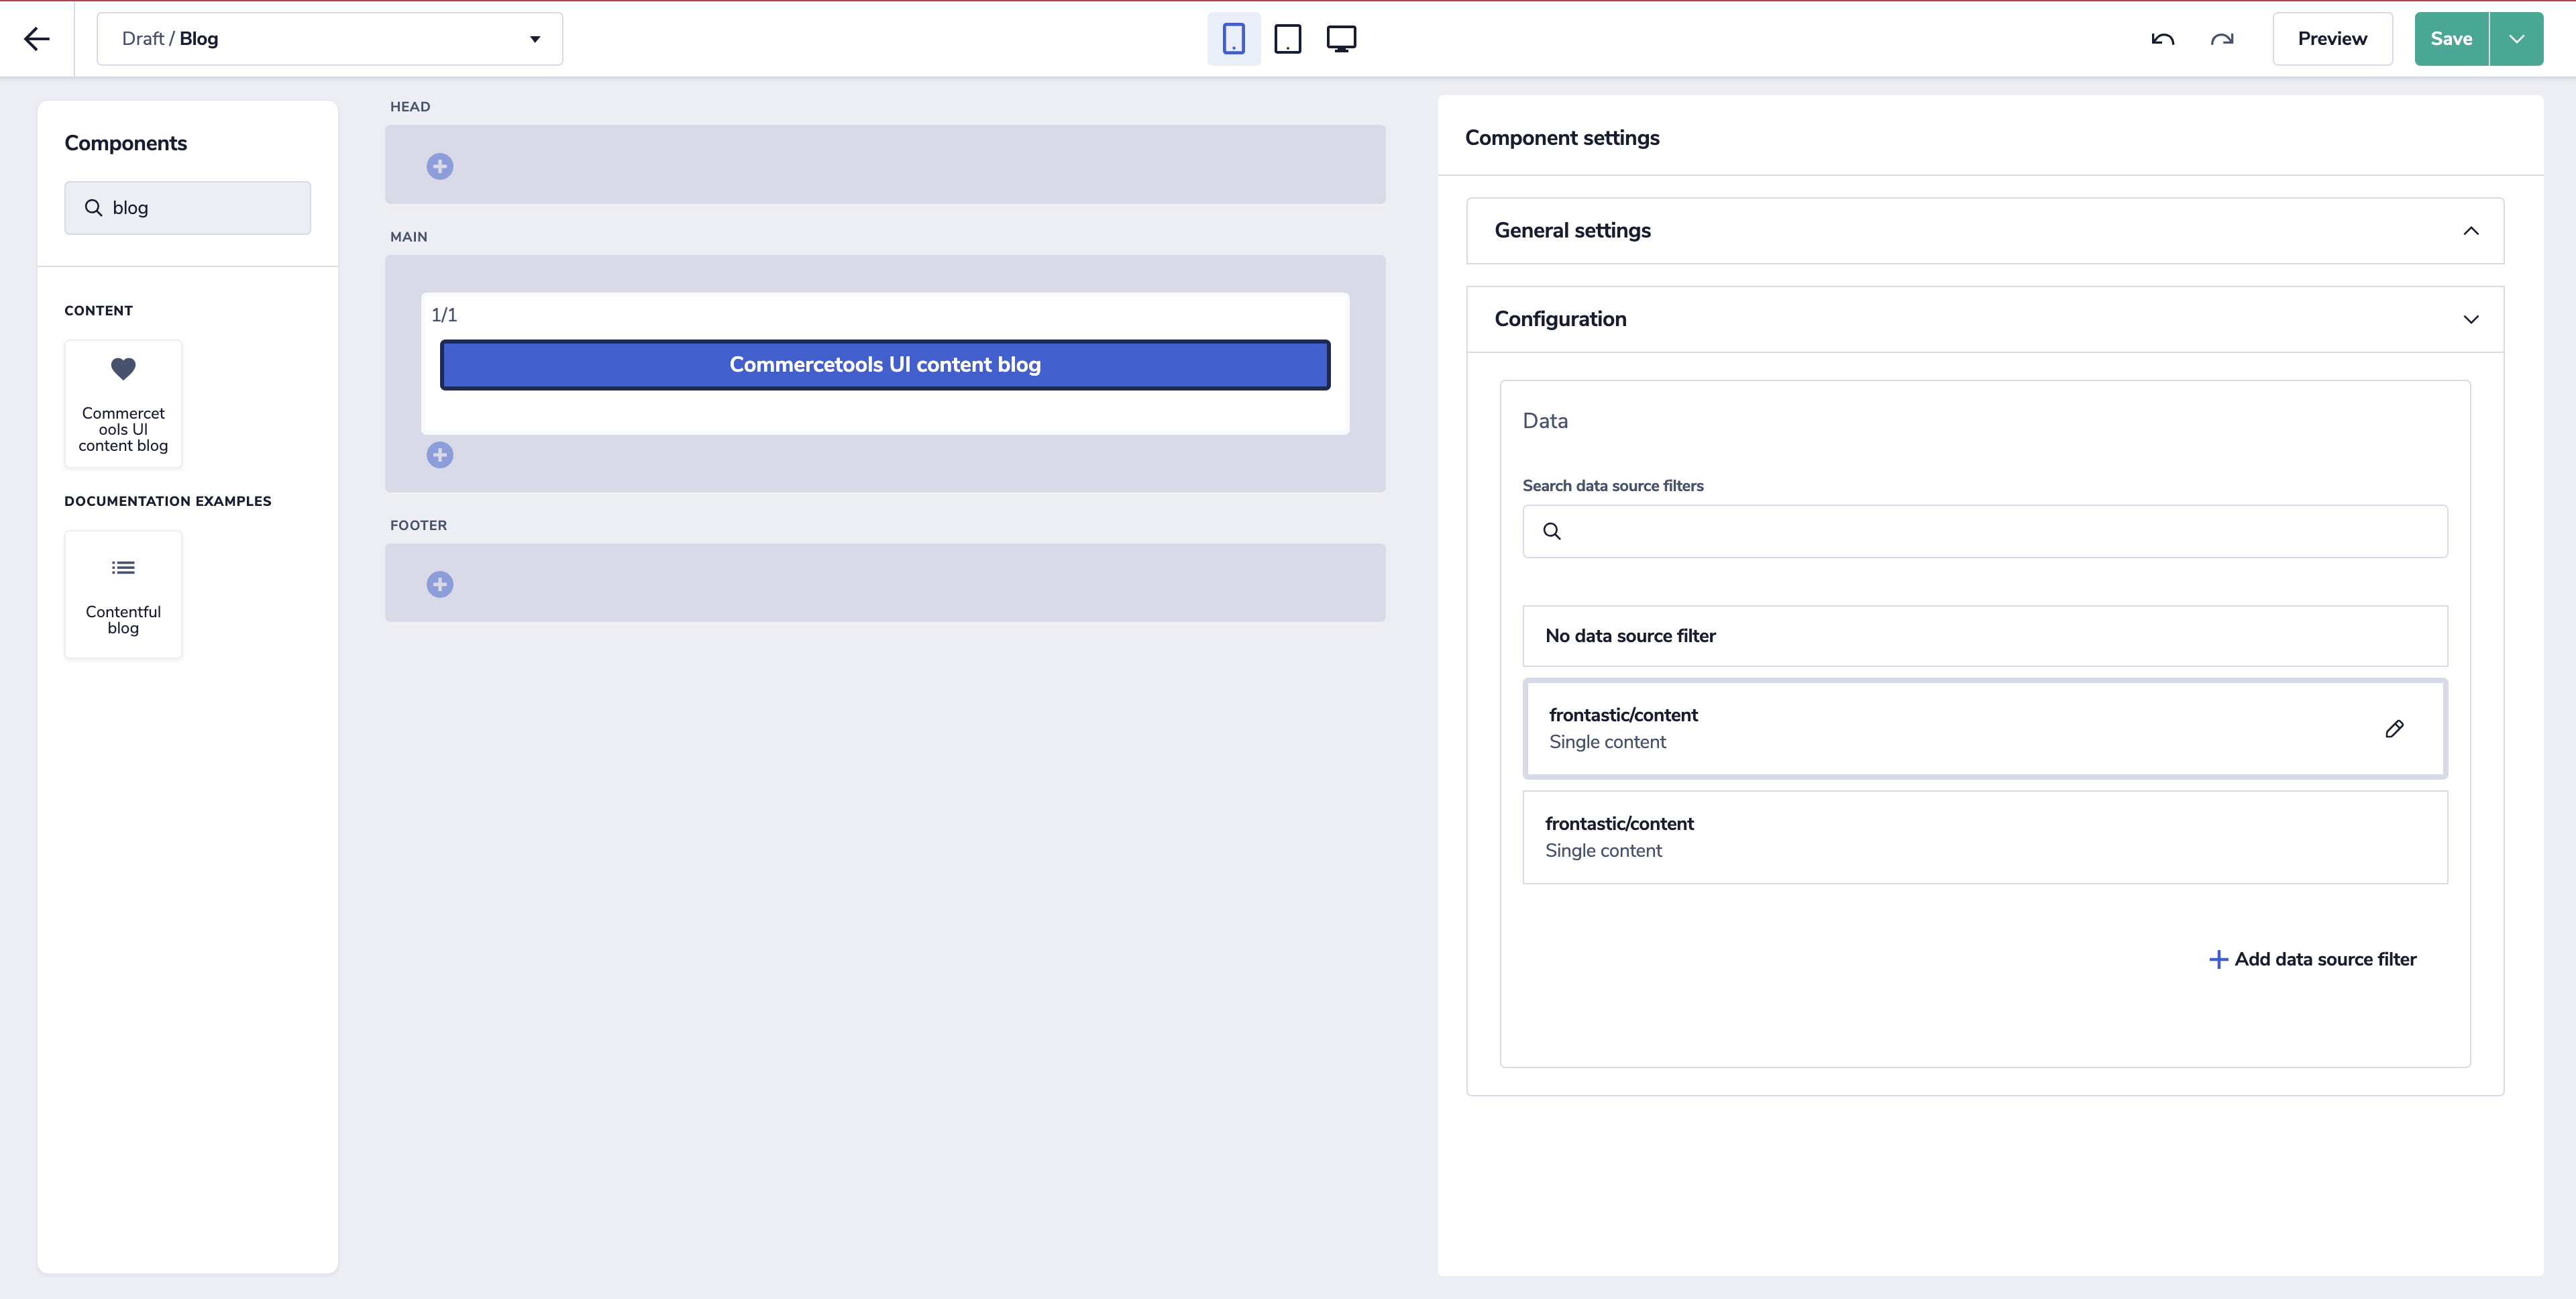
10. In the **Draft** section, hover on the **Blog** page version, click the **more** icon, and select **Make default**.
## Implement a blog dynamic page
The blog dynamic page should match the URL `/contentful/blog/`, fetch the content for the `blogId` from Contentful API, and render the markdown content on the page.
1. In the `backend/content-contentful/index.ts` file of your project, add the sample code below specifying your Contentful credentials. This way, you implement the `dynamic-page-handler` extension to fetch the content for `contentId` from Contentful.
```typescript title="index.ts"
import {
DataSourceConfiguration,
DataSourceContext,
DynamicPageContext,
DynamicPageSuccessResult,
ExtensionRegistry,
Request,
} from '@frontastic/extension-types';
import ContentApi from './apis/ContentApi';
import * as ContentActions from './actionControllers/ContentController';
import { getLocale } from './utils/Request';
export default {
actions: {
content: ContentActions,
},
'data-sources': {
'frontastic/content': async (
config: DataSourceConfiguration,
context: DataSourceContext
) => {
const contentApi = new ContentApi(
context.frontasticContext,
getLocale(context.request)
);
return {
dataSourcePayload: await contentApi.getContent(
config.configuration.contentId
),
};
},
},
'dynamic-page-handler': async (
request: Request,
context: DynamicPageContext
): Promise => {
const [_, blogId] = request.query.path.match(
new RegExp('/contentful/blog/([^ /]+)')
);
if (blogId) {
const contentApi = new ContentApi(
context.frontasticContext,
getLocale(request)
);
return {
dynamicPageType: 'contentful/blog',
dataSourcePayload: await contentApi.getContent(blogId),
};
}
return {
dynamicPageType: 'contentful/blog',
dataSourcePayload: {},
};
},
} as ExtensionRegistry;
```
2. Open `` in your browser to see your blog content.
## Related pages
- [Area overview page with navigation](/frontend-development.md)
- [Previous page: Bloomreach](/frontend-development/bloomreach.md)
- [Next page: Contentstack](/frontend-development/contentstack.md)
- [Search documentation and API specs](/search.md)