# Forms
Learn about implementing forms and validation in your React components.
One of the most common requirements when implementing a user interface is the usage of forms.
To facilitate the development of forms, we provide ready-to-use form field components based on the commercetools design system, [UI Kit](https://uikit.commercetools.com/).
The code examples on this page show `useApplicationContext` which is applicable to Custom Applications. If you're working with Custom Views, you'll need to use `useCustomViewContext` instead.
## Form state management
Forms generally consist of a group of inputs that users interact with to trigger actions.
In this process, all user interactions must be tracked, managed, and reflected in the UI. To achieve this, a form must maintain its own state.
[Formik](https://formik.org/) is used as the preferred form state management library when building user interfaces.
Formik comes with several built-in features, including validation, array fields, input states, and async submission.
Implementing a simple form could look something like this:
```jsx highlightLines="9"
import { useFormik } from 'formik';
import { useApplicationContext } from '@commercetools-frontend/application-shell-connectors';
import LocalizedTextField from '@commercetools-uikit/localized-text-field';
import LocalizedTextInput from '@commercetools-uikit/localized-text-input';
import PrimaryButton from '@commercetools-uikit/primary-button';
import validate from './validate';
const ChannelsForm = () => {
const { dataLocale, languages } = useApplicationContext((context) => ({
dataLocale: context.dataLocale,
languages: context.project.languages,
}));
const formik = useFormik({
// We assume that the form is empty. Therefore, we need to provide default values.
initialValues: {
// A Channel's `name`: https://docs.commercetools.com/api/projects/channels
name: LocalizedTextInput.createLocalizedString(languages),
},
validate,
onSubmit: async (formikValues) => {
alert(`name: ${formikValues.name}`);
// Do something async
},
});
return (
);
};
```
## Field and input components
The commercetools [UI Kit](https://uikit.commercetools.com/) library provides several UI components for working with forms. We recommend that you use the field components whenever possible since they provide all the recommended features for rendering form elements.
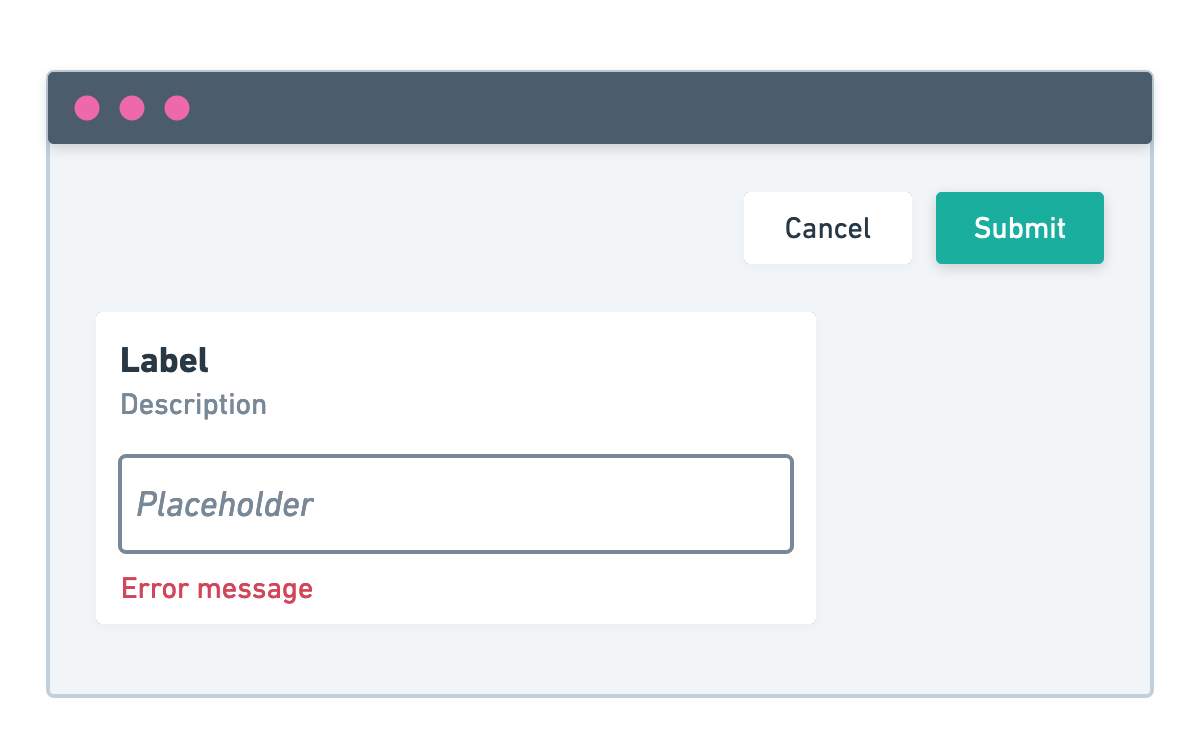
A field component consists of an input element wrapped with other field elements (such as label, description, error message, hint, and badge).
Depending on the use case, you might want to use a date field, a text field, or a select field. In the UI Kit library, there are many components that cover different use cases. For more information about field and input components check their related packages in the [commercetools/ui-kit](https://github.com/commercetools/ui-kit) repository.
All UI Kit field components have a related input component, for example `` -> ``.
### Accessibility support
All field and input components have built-in support for accessibility features such as aria labels, keyboard navigation, focus management, and error messaging.
You can test field components with the [React Testing Library](https://github.com/testing-library/react-testing-library) by using selectors such as `*ByLabelText` and `*ByRole`.
## Form validation
An important part of most forms is validation. You should validate form constraints such as required fields and check additional semantic requirements (for example, checking that the value is a valid URL).
Aside from client-side validation, forms can also perform asynchronous validation against an API to ensure data correctness before form submission.
For that, Formik lets you to implement a [`validate`](https://formik.org/docs/api/formik#validate-values-values--formikerrorsvalues--promiseany) function that returns an object containing errors.
```ts
type TFieldErrors = Record;
// Similar shape of `FormikErrors` but values are `TFieldErrors` objects.
type TCustomFormErrors = {
[K in keyof Values]?: TFieldErrors;
};
declare const validate = (values: FormValues) => TCustomFormErrors;
```
In this example, the object returned from the `validate` function should contain properties correlating to field names with their values being objects with reasons for the given error.
For example:
```js title="validate.js"
import LocalizedTextInput from '@commercetools-uikit/localized-text-input';
const validate = (values) => {
const errors = {};
if (LocalizedTextInput.isEmpty(values.name)) {
errors.name = { missing: true };
}
return errors;
};
```
In this example, we are validating that the `name` field has a required value. If the value is empty (no localized values have been provided), we assign to the `errors.name` property an error object with the error key `missing` set to `true`.
In the field component, you must assign the `errors` and `touched` props. This ensures that the field component renders an error message if the `validate` function returned one.
```js highlightLines="7-10"
```
Error messages are only shown when the `touched` value for the specific field is `true`. This occurs whenever the user stops interacting with a field (loses focus). If the user is interacting with a field for the first time there is no need to show validation.
By default, field components have built-in error messages for the `missing` error key. Any other error message can be mapped and rendered using the `renderError` function.
```js highlightLines="10-17"
{
switch (errorKey) {
case 'invalid':
return 'The value is invalid.';
default:
return null;
}
}}
touched={formik.touched.name}
onChange={formik.handleChange}
onBlur={formik.handleBlur}
/>
```
## Form data conversion
Implementing forms is almost always related to managing data as a bidirectional data flow.

To facilitate converting data to and from a form, we recommend defining some conversion functions.
- `docToFormValues`: converts data, for instance, fetched from an API, to the form-specific format.
- `formValuesToDoc`: converts form data back to the original data format, for instance, to be used in an API.
### docToFormValues
You can use the `docToFormValues` to initialize a form.
```jsx highlightLines="3,10"
import { useFormik } from 'formik';
import { useApplicationContext } from '@commercetools-frontend/application-shell-connectors';
import { docToFormValues } from './conversions';
const ChannelsForm = (props) => {
const languages = useApplicationContext(
(context) => context.project.languages
);
const formik = useFormik({
initialValues: docToFormValues(props.data, languages),
// ...
});
// ...
};
```
In our Channels example, it looks like this:
```js title="conversions.js"
import LocalizedTextInput from '@commercetools-uikit/localized-text-input';
export const docToFormValues = (doc, languages) => ({
name: LocalizedTextInput.createLocalizedString(languages, doc?.name),
});
```
Most UI Kit form field components expose some static methods to help with data conversion and validation. We recommend that you check if these methods are available in either the field or the input component.
For example, to validate if a text field is empty, use `TextInput.isEmpty()`.
### formValuesToDoc
You can use the `formValuesToDoc` when submitting the form.
```jsx highlightLines="2,7"
import { useFormik } from 'formik';
import { formValuesToDoc } from './conversions';
const ChannelsForm = () => {
const formik = useFormik({
onSubmit: async (formValues) => {
const updateData = formValuesToDoc(formValues);
},
// ...
});
// ...
};
```
In our Channels example, it looks like this:
```js title="conversions.js"
import LocalizedTextInput from '@commercetools-uikit/localized-text-input';
import { transformLocalizedStringToLocalizedField } from '@commercetools-frontend/l10n';
export const formValuesToDoc = (formValues) => ({
name: transformLocalizedStringToLocalizedField(
LocalizedTextInput.omitEmptyTranslations(formValues.name)
),
// ...
});
```
Most of the time you would have simple 1:1 mapping. However, we still recommend using these conversion functions as a best practice and to help decouple the data transformation logic from the form component.
For instance, the form might only need a couple of fields even though the data object has many more. By being explicit in the conversion, we ensure that only the necessary data is passed to the form.
## Build a form page
Let's apply what we just learned in our `Channels` application to add a page to view and manage a Channel's details. In this scenario, we want to let the user create new channels and update existing channels.
We can implement the form as a component and re-use it in both the create and details pages. The only difference is that the form for the create page will be initially empty and the form for the details page will have some data.
```jsx title="channels-form.js"
import { useFormik } from 'formik';
import { useApplicationContext } from '@commercetools-frontend/application-shell-connectors';
import LocalizedTextField from '@commercetools-uikit/localized-text-field';
import TextField from '@commercetools-uikit/text-field';
import PrimaryButton from '@commercetools-uikit/primary-button';
import SecondaryButton from '@commercetools-uikit/secondary-button';
import Spacings from '@commercetools-uikit/spacings';
import validate from './validate';
const ChannelsForm = (props) => {
const dataLocale = useApplicationContext((context) => context.dataLocale);
const formik = useFormik({
// Pass initial values from the parent component.
initialValues: props.initialValues,
// Handle form submission in the parent component.
onSubmit: props.onSubmit
validate,
enableReinitialize: true,
});
return (
);
}
```
Now that we have defined our form component, we can implement the "create" and "details" pages.
The "create" page does not have any initial data, so we can use our conversion function `docToFormValues()` with default values.
```js title="channels-create.js"
import { useCallback } from 'react';
import { useApplicationContext } from '@commercetools-frontend/application-shell-connectors';
import Text from '@commercetools-uikit/text';
import Spacings from '@commercetools-uikit/spacings';
import { docToFormValues, formValuesToDoc } from './conversions';
import ChannelsForm from './channels-form';
const ChannelsCreate = () => {
const languages = useApplicationContext(
(context) => context.project.languages
);
const handleSubmit = useCallback(
async (formValues) => {
const data = formValuesToDoc(formValues);
// This would trigger the request, for example a mutation.
const result = await createChannel(data);
// If successful, show a notification and redirect
// to the Channels details page.
// If errored, show an error notification.
},
[createChannel]
);
return (
Create a channel
);
};
```
On the "details" page, we need to fetch the data first, then initialize the form with the data.
```js title="channels-details.js"
import { useCallback } from 'react';
import { useRouteMatch } from 'react-router-dom';
import { useApplicationContext } from '@commercetools-frontend/application-shell-connectors';
import Text from '@commercetools-uikit/text';
import Spacings from '@commercetools-uikit/spacings';
import LoadingSpinner from '@commercetools-uikit/loading-spinner';
import useChannelsFetcher from './use-channels-fetcher';
import useChannelsUpdater from './use-channels-updater';
import { docToFormValues, formValuesToDoc } from './conversions';
import ChannelsForm from './channels-form';
const ChannelsDetails = (props) => {
const match = useRouteMatch();
const languages = useApplicationContext(
(context) => context.project.languages
);
const { data: channel } = useChannelsFetcher(match.params.id);
const { updateChannel } = useChannelsUpdater(match.params.id);
const handleSubmit = useCallback(
async (formValues) => {
const data = formValuesToDoc(formValues);
// This would trigger the request, for example a mutation.
const result = await updateChannel(data);
// If successful, show a notification.
// If errored, show an error notification.
},
[updateChannel]
);
if (!channel) {
return ;
}
return (
Manage Channel
);
};
```
### Use modal pages
Generally, a "create" or "details" page containing a form can be implemented using either the [FormModalPage](/merchant-center-customizations/tooling-and-configuration/commercetools-frontend-application-components.md#formmodalpage) or the [CustomFormModalPage](/merchant-center-customizations/tooling-and-configuration/commercetools-frontend-application-components.md#customformmodalpage) components.
Using these components has the advantage of providing the form control buttons (for example, `Cancel` and `Save`) in the correct place, according to our design guidelines.
However, the form component must be defined "outside" of the modal page to be able to pass the necessary functions to the modal page to interact with the form.
Therefore, our Channels form must be refactored to define all the form elements but return them using the function-as-child component pattern.
```jsx title="channels-form.js"
import { useFormik } from 'formik';
import { useApplicationContext } from '@commercetools-frontend/application-shell-connectors';
import LocalizedTextField from '@commercetools-uikit/localized-text-field';
import TextField from '@commercetools-uikit/text-field';
import Spacings from '@commercetools-uikit/spacings';
import validate from './validate';
const ChannelsForm = (props) => {
const dataLocale = useApplicationContext((context) => context.dataLocale);
const formik = useFormik({
// Pass initial values from the parent component.
initialValues: props.initialValues,
// Handle form submission in the parent component.
onSubmit: props.onSubmit
validate,
enableReinitialize: true,
});
// Only contains the form elements, no buttons.
const formElements = (
);
return props.children({
formElements,
isDirty: formik.dirty,
isSubmitting: formik.isSubmitting,
submitForm: formik.handleSubmit,
handleCancel: formik.handleReset,
});
}
```
The Channels pages can then be refactored as following:
```js title="channels-create.js"
import { useCallback } from 'react';
import { useApplicationContext } from '@commercetools-frontend/application-shell-connectors';
import { FormModalPage } from '@commercetools-frontend/application-components';
import { docToFormValues, formValuesToDoc } from './conversions';
import ChannelsForm from './channels-form';
const ChannelsCreate = (props) => {
const languages = useApplicationContext(
(context) => context.project.languages
);
const handleSubmit = useCallback(
async (formValues) => {
const data = formValuesToDoc(formValues);
// This would trigger the request, for example a mutation.
const result = await createChannel(data);
// If successful, show a notification and redirect
// to the Channels details page.
// If errored, show an error notification.
},
[createChannel]
);
return (
{(formProps) => {
return (
{
formProps.handleCancel();
props.onClose();
}}
onPrimaryButtonClick={formProps.submitForm}
>
{formProps.formElements}
);
}}
);
};
```
```js title="channels-details.js"
import { useCallback } from 'react';
import { useRouteMatch } from 'react-router-dom';
import { useApplicationContext } from '@commercetools-frontend/application-shell-connectors';
import { FormModalPage } from '@commercetools-frontend/application-components';
import LoadingSpinner from '@commercetools-uikit/loading-spinner';
import useChannelsFetcher from './use-channels-fetcher';
import useChannelsUpdater from './use-channels-updater';
import { docToFormValues, formValuesToDoc } from './conversions';
import ChannelsForm from './channels-form';
const ChannelsDetails = (props) => {
const match = useRouteMatch();
const languages = useApplicationContext(
(context) => context.project.languages
);
const { data: channel } = useChannelsFetcher(match.params.id);
const { updateChannel } = useChannelsUpdater(match.params.id);
const handleSubmit = useCallback(
async (formValues) => {
const data = formValuesToDoc(formValues);
// This would trigger the request, for example a mutation.
const result = await updateChannel(data);
// If successful, show a notification.
// If errored, show an error notification.
},
[updateChannel]
);
if (!channel) {
return ;
}
return (
{(formProps) => {
return (
{formProps.formElements}
);
}}
);
};
```
### Split form fields
Forms that contain many different fields can cause accessibility issues. To improve usability, you can split the form component into multiple smaller components. As a general guideline, you can create one separate component for each form field. For example, a ``, a ``, and so on.
To use the `useField` hook, the form must be wrapped with the `` component instead of using the `useFormik` hook. This ensures that the React context is properly defined.
As a result, the form component looks like this:
```jsx title="channels-form.js"
import { Formik } from 'formik';
import Spacings from '@commercetools-uikit/spacings';
import FormChannelNameField from './form-channel-name-field';
import FormChannelKeyField from './form-channel-key-field';
import validate from './validate';
const ChannelsForm = (props) => {
return (
{(formikProps) => {
// Only contains the form elements, no buttons.
const formElements = (
);
return props.children({
formElements,
isDirty: formikProps.dirty,
isSubmitting: formikProps.isSubmitting,
submitForm: formikProps.handleSubmit,
handleCancel: formikProps.handleReset,
});
}}
);
};
```
One of the advantages of splitting up the form fields is to encapsulate the logic. You can see that we don't explicitly pass any props to these components. Instead, each component can access the required form data from the form context, using Formik's `useField` hook.
```js title="form-channel-name.js"
import { useField } from 'formik';
import { useApplicationContext } from '@commercetools-frontend/application-shell-connectors';
import LocalizedTextField from '@commercetools-uikit/localized-text-field';
const FormChannelNameField = () => {
const dataLocale = useApplicationContext((context) => context.dataLocale);
const [field, meta] = useField('name');
return (
);
};
```
The `field` object can be spread to the UI Kit field component (it contains the props like `name`, `onChange`, etc.) and the `meta` object contains things like `touched` and `error` values of the specific field.
## Related pages
- [Area overview page with navigation](/merchant-center-customizations.md)
- [Previous page: Routing](/merchant-center-customizations/development/routing.md)
- [Next page: Page content layouts](/merchant-center-customizations/development/page-content-layouts.md)