Create a Customer

Learn how to create a Customer with the commercetools SDKs.

  • After completing this page, you should be able to:

    • Identify the correct process for creating a Customer with the commercetools SDKs.
  • As this page encourages you to follow along in your own developer environment, make sure that you have followed all of the steps in the Prepare your work environment module to set up your IDE to work with Composable Commerce Projects.

    As we mentioned previously, the first step in the resource lifecycle is to create the resource. In Composable Commerce, if we want to create a Customer, we must create and post a CustomerDraft. We send the CustomerDraft to Composable Commerce, and then receive a response that confirms the Customer has been created.

    Let's look at the CustomerDraft resource representation:

    The docs page for Customers shows the required and optional fields for CustomerDraft.

    We can see that the CustomerDraft must have a unique email address. We know this because the field is marked with a red asterisk in the CustomerDraft representation. Any combination of the email field and any other field in the CustomerDraft can be used to create a Customer.

    A password is also required when authenticationMode is set to Password.

    Use the SDKs

    Let’s have a look at how we create a CustomerDraft with the Java and TypeScript SDKs. We recommend following along with your IDE, but remember to adjust the file and package names as needed.

    In the Java SDK we make extensive use of the builder pattern to construct objects. In the following example, we create a Customer with an address. As you can see, to construct a address we use the builder pattern. Make sure that you provide all mandatory fields.

    In the TypeScript SDK, you must build the draft yourself.

    We will continue with the presented folder design from the Prepare your environment module. We will create a Service class (CustomerService.java / customer.js) in the impl-Package. This service class will prepare our requests.

    An exercise class (CustomerExercise.java / exercise.js) will then use the prepared methods to combine those requests in a meaningful way. Here we will then log the results and verify that everything is working correctly.

    TypeScript SDK

    In the same repository you set up in the Prepare your work environment module, create a file called 
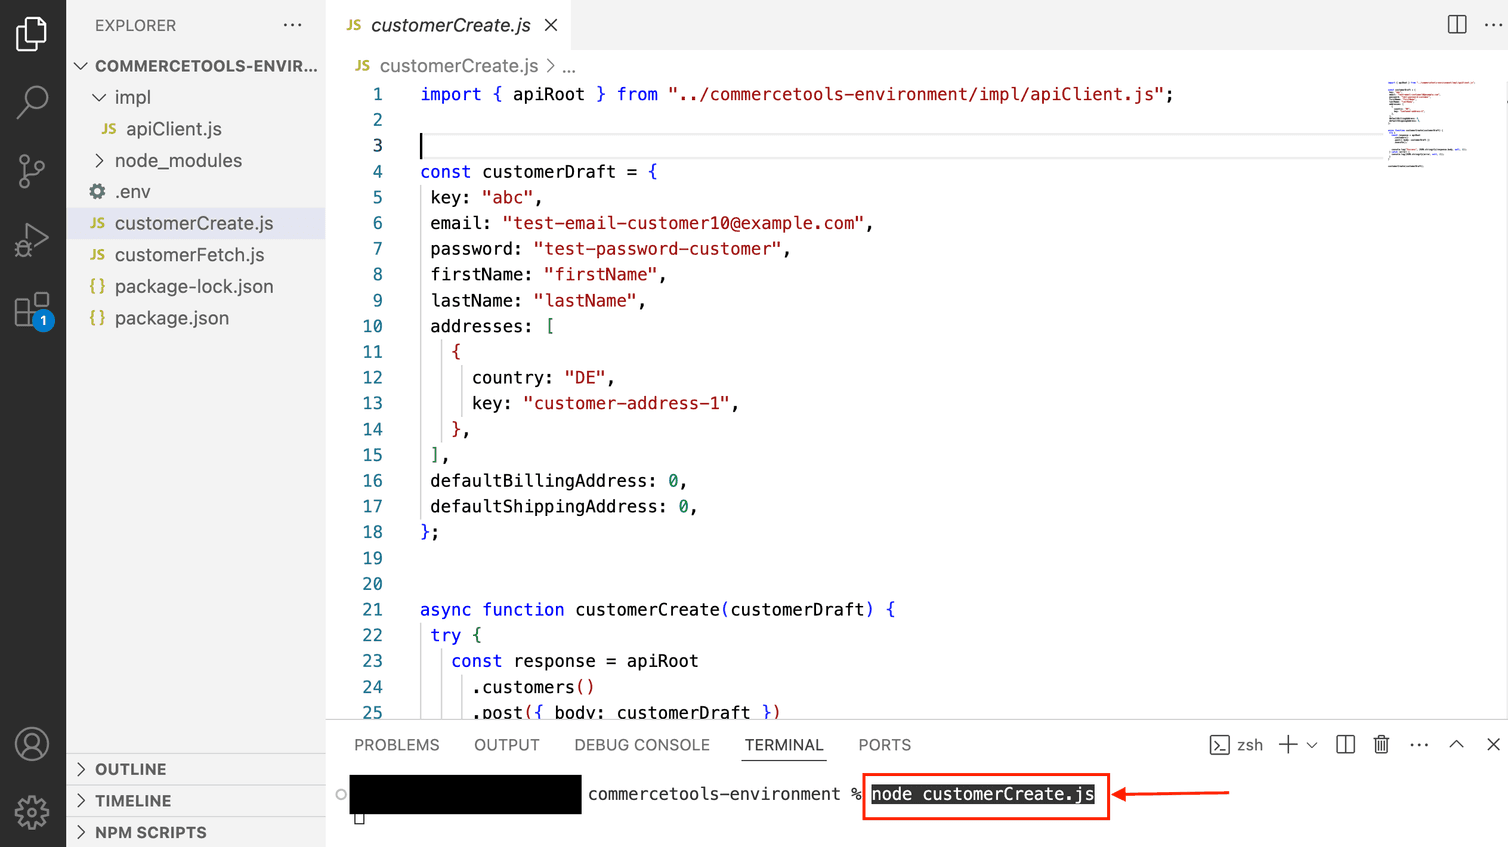
customerCreate.js and copy the following code into it:

    import { apiRoot } from '../impl/apiClient.js';
    const customerDraft = {
    key: 'abc',
    email: 'test-email-customer10@example.com',
    password: 'test-password-customer',
    firstName: 'firstName',
    lastName: 'lastName',
    addresses: [
    {
    country: 'DE',
    key: 'customer-address-1',
    },
    ],
    defaultBillingAddress: 0,
    defaultShippingAddress: 0,
    };
    async function customerCreate() {
    try {
    const response = apiRoot
    .customers()
    .post({ body: customerDraft })
    .execute();
    console.log('Success', JSON.stringify((await response).body, null, 2));
    } catch (error) {
    console.log(JSON.stringify(error, null, 2));
    }
    }
    customerCreate();

    Use the following command to execute the code in your terminal:

    node customerCreate.js

    CustomerCreate.js file about to be executed in Visual Studio Code.

    Jump to the response section to check if your request has been successful.

    Java SDK

    In the impl folder of the repository you set up in the Prepare your work environment module, create a service class called CustomerService.java and copy the following code into it:

    package impl;
    import com.commercetools.api.client.ProjectApiRoot;
    import com.commercetools.api.models.common.AddressBuilder;
    import com.commercetools.api.models.common.AddressDraftBuilder;
    import com.commercetools.api.models.customer.*;
    import com.commercetools.api.models.customer_group.CustomerGroup;
    import com.commercetools.api.models.customer_group.CustomerGroupDraftBuilder;
    import com.commercetools.api.models.customer_group.CustomerGroupResourceIdentifierBuilder;
    import io.vrap.rmf.base.client.ApiHttpResponse;
    import java.util.concurrent.CompletableFuture;
    public class CustomerService {
    final ProjectApiRoot apiRoot;
    public CustomerService(final ProjectApiRoot client) {
    this.apiRoot = client;
    }
    public CompletableFuture<ApiHttpResponse<CustomerSignInResult>> createCustomer(
    final String email,
    final String password,
    final String customerKey,
    final String firstName,
    final String lastName,
    final String country) {
    return
    apiRoot
    .customers()
    .post(
    CustomerDraftBuilder.of()
    .firstName(firstName)
    .lastName(lastName)
    .key(customerKey)
    .email(email)
    .password(password)
    .addresses(
    AddressDraftBuilder.of()
    .firstName(firstName)
    .lastName(lastName)
    .key(customerKey + "-home")
    .country(country)
    .build()
    )
    .build()
    )
    .execute();
    }
    }

    Create a second file called CustomerCreate.java in the main folder of the same repository.

    import com.commercetools.api.client.ProjectApiRoot;
    import impl.CustomerService;
    import org.slf4j.Logger;
    import org.slf4j.LoggerFactory;
    import java.io.IOException;
    import java.util.concurrent.ExecutionException;
    import static impl.ClientService.createApiClient;
    public class CustomerCreate {
    public static void main(String[] args) throws IOException, ExecutionException, InterruptedException {
    final ProjectApiRoot client = createApiClient();
    Logger logger = LoggerFactory.getLogger(CustomerCreate.class.getName());
    CustomerService customerService = new CustomerService(client);
    // Create a new customer
    logger.info("Customer created: " +
    customerService.createCustomer(
    "example-customer@example.com",
    "password",
    "john-doe-example",
    "John",
    "Doe",
    "US"
    )
    .toCompletableFuture().get()
    .getBody().getCustomer().getFirstName()
    );
    }
    }

    Let’s run our code.

    Executing CustomerCreate.java in IntelliJ IDEA.

    Response

    Let’s see what a successful response looks like.

    If our Customer has been created, we can view them in the Merchant Center:

    New Customer visible in Merchant Center.

    Here in our example you can see that the new Customer has been created.

    After creating a Customer with the SDK, you should also receive a JSON response as follows:

    {
    "customer": {
    "id": "cfab735c-2693-4a27-980c-921686c6750b",
    "version": 1,
    "createdAt": "2024-01-16T06:00:31.099Z",
    "lastModifiedAt": "2024-01-16T06:00:31.099Z",
    "lastModifiedBy": {
    "clientId": "VdkVvQ_2M82WsxJFU3A8A6Fz",
    "isPlatformClient": false
    },
    "createdBy": {
    "clientId": "VdkVvQ_2M82WsxJFU3A8A6Fz",
    "isPlatformClient": false
    },
    "email": "example-customer@example.com",
    "firstName": "John",
    "lastName": "Doe",
    "password": "**removed from output**",
    "addresses": [
    {
    "id": "yUmV0kHa",
    "firstName": "John",
    "lastName": "Doe",
    "country": "US",
    "key": "john-doe-example-home"
    }
    ],
    "shippingAddressIds": [],
    "billingAddressIds": [],
    "isEmailVerified": false,
    "key": "john-doe-example",
    "stores": [],
    "authenticationMode": "Password"
    }
    }

    Nice work! Let’s do a quick knowledge check before moving on to the next operation.

    Test your knowledge