The Team area lets you manage users who can work on your project from the Studio.

User roles
You can assign the following roles to Studio users:
- Admin: has unrestricted access to all the features within the Studio.
- Editor: has the permissions required for website content management.
- Collaborator: has the permissions required to work with editors, but with some restrictions.
- Developer: has the permissions required to manage content and to make code changes.
- Junior developer: has the permissions required to manage content and to make code changes, but with some restrictions.
- Viewer: has view-only permissions in all areas and environments.
| Studio area/feature | Action/environment | Admin | Editor | Collaborator | Developer | Junior Developer |
|---|---|---|---|---|---|---|
| Access to environments | ||||||
| Production | ✓ | ✓ | ✓ | ✓ | ||
| Staging | ✓ | ✓ | ✓ | ✓ | ||
| Development | ✓ | ✓ | ✓ | |||
| Team | ||||||
| Add users | ✓ | |||||
| Delete users | ✓ | |||||
| Edit user roles | ✓ | |||||
| View users | ✓ | ✓ | ✓ | ✓ | ✓ | |
| Project settings | ||||||
| Edit | ✓ | ✓ | ✓ | |||
| View | ✓ | ✓ | ✓ | ✓ | ✓ | |
| Components | ||||||
| Create | ✓ | ✓ | ✓ | |||
| Upload | ✓ | ✓ | ✓ | |||
| Edit | ✓ | ✓ | ✓ | |||
| Delete | ✓ | ✓ | ||||
| Page folders | ||||||
| Create | ✓ | ✓ | ✓ | ✓ | ||
| Edit settings | ✓ | ✓ | ✓ | ✓ | ✓ | |
| Duplicate | ✓ | ✓ | ✓ | ✓ | ||
| Delete | ✓ | ✓ | ✓ | ✓ | ||
| Move | ✓ | ✓ | ✓ | ✓ | ||
| Page versions (from Site builder, Dynamic pages, Page templates, and the page builder) | ||||||
| Create | ✓ | ✓ | ✓ | ✓ | ✓ | |
| Edit | ✓ | ✓ | Only for non-live page versions. | ✓ | ✓ | |
| Edit settings | ✓ | ✓ | Only for non-live page versions. | ✓ | ✓ | |
| Duplicate | ✓ | ✓ | ✓ | ✓ | ✓ | |
| Schedule | ✓ | ✓ | ✓ | ✓ | ||
| Make default | ✓ | ✓ | ✓ | ✓ | ||
| Make live | ✓ | ✓ | ✓ | ✓ | ||
| Archive | ✓ | ✓ | ✓ | ✓ | ||
| Save as template | ✓ | ✓ | ✓ | ✓ | ✓ | |
| Delete | ✓ | ✓ | ✓ | ✓ | ||
| Assign for review | ✓ | ✓ | ✓ | ✓ | ✓ | |
| Review and comment | ||||||
| Comment | ✓ | ✓ | ✓ | ✓ | ✓ | |
| Assign pages | ✓ | ✓ | ✓ | ✓ | ✓ | |
| Mark as reviewed | ✓ | Only if the user is assignee. | Only if the user is assignee. | Only if the user is assignee. | Only if the user is assignee. | |
| Dynamic page rules | ||||||
| Create | ✓ | ✓ | ✓ | ✓ | ✓ | |
| Edit settings | ✓ | ✓ | ✓ | ✓ | ||
| Delete | ✓ | ✓ | ✓ | ✓ | ||
| Duplicate | ✓ | ✓ | ✓ | ✓ | ✓ | |
| Page templates | ||||||
| Create | ✓ | ✓ | ✓ | ✓ | ✓ | |
| Edit | ✓ | ✓ | Only for non-live page versions. | ✓ | ✓ | |
| Delete | ✓ | ✓ | ✓ | ✓ | ||
| Component groups | ||||||
| Create | ✓ | ✓ | ✓ | ✓ | ✓ | |
| Edit | ✓ | ✓ | Only if not used on page versions. | ✓ | ✓ | |
| Edit settings | ✓ | ✓ | Only if not used on page versions. | ✓ | ✓ | |
| Delete | ✓ | ✓ | ✓ | ✓ | ||
| Duplicate | ✓ | ✓ | ✓ | ✓ | ✓ | |
| Media | ||||||
| Add | ✓ | ✓ | ✓ | ✓ | ✓ | |
| Edit | ✓ | ✓ | ✓ | ✓ | ✓ | |
| Delete | ✓ | ✓ | ✓ | ✓ | ||
| Redirects | ||||||
| Add | ✓ | ✓ | ✓ | ✓ | ✓ | |
| Edit | ✓ | ✓ | ✓ | ✓ | ✓ | |
| Delete | ✓ | ✓ | ✓ | ✓ | ||
| Schemas | ||||||
| Upload | ✓ | ✓ | ✓ | |||
| Edit | ✓ | ✓ | ✓ | |||
| Deployment | ||||||
| Deploy | ✓ | ✓ | View only | |||
| API keys | ||||||
| Add | ✓ | ✓ | ✓ | |||
| Revoke | ✓ | ✓ | ||||
| Data source schemas | ||||||
| Create | ✓ | ✓ | ||||
| Upload | ✓ | ✓ | ||||
| Edit | ✓ | ✓ | ||||
| Delete | ✓ | ✓ | ||||
| Continuous Integration | ||||||
| View | ✓ | ✓ | ✓ | |||
| Delete builds | ✓ | ✓ | ||||
| Dynamic page schemas | ||||||
| Create | ✓ | ✓ | ||||
| Upload | ✓ | ✓ | ||||
| Edit | ✓ | ✓ | ||||
| Delete | ✓ | ✓ |
Add users
To add a user, follow these steps:
- From the Studio home page or from the left menu, go to Team.
- Click Add user: the Invite user dialog opens.
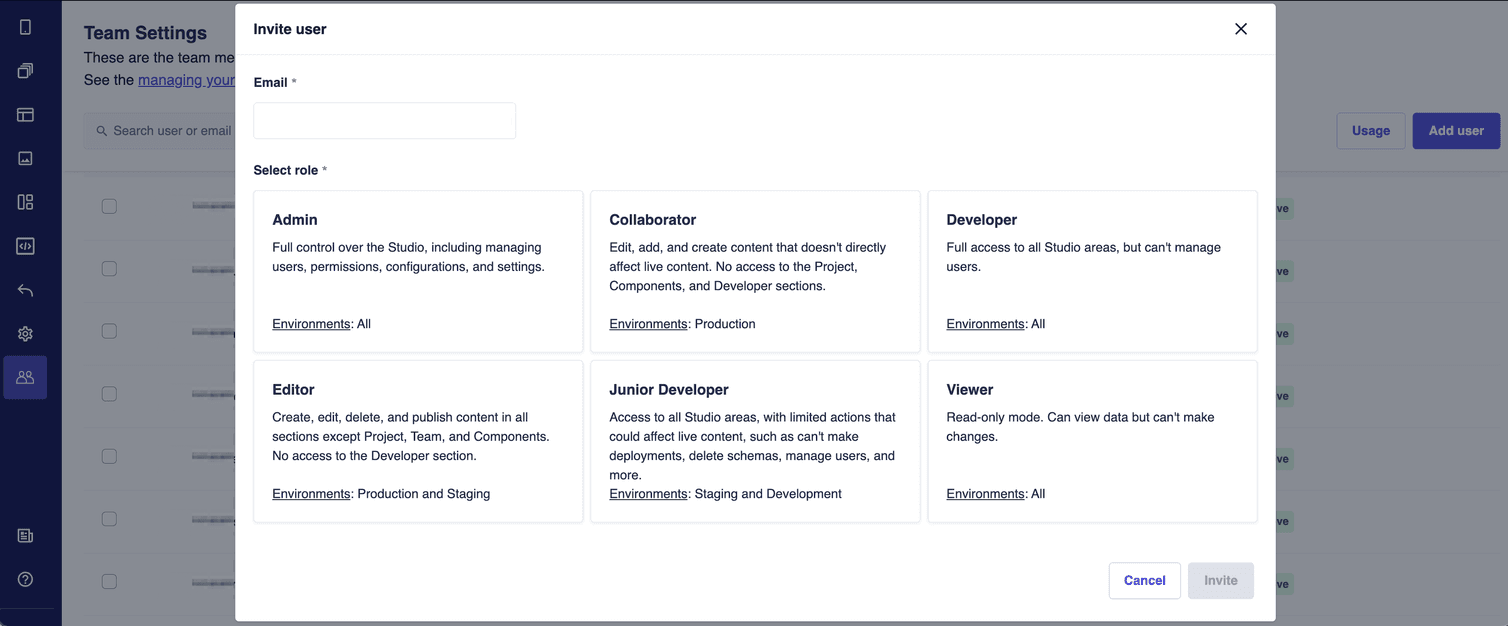
- In the Email field, enter the email address of the user you want to add.
- From the Select role area, select the role to assign to the user.
- Click Invite: an invitation email will be sent to the user.
The invited user receives an email with instructions to activate their account and they are added to the users list with the Invitation sent status.
The link in the invitation email is valid for 72 hours. If the user doesn't activate their account by this time, an Admin user must resend the invitation.
Resend invitation
To resend an invitation to a user when the previous invitation expired, follow these steps:
- From the Studio home page or from the left menu, go to Team.
- Search for the user to resend the invitation to, you will see the Invitation expired status.
- Hold your pointer over the user and click the Resend invite icon.
Edit user roles
To edit the role of an active user, follow these steps:
- From the Studio home page or from the left menu, go to Team.
- Search for the user whose role you wish to change and select the new role from the drop-down in the Status column.
Delete users
To delete a user, follow these steps:
-
From the Studio home page or from the left menu, go to Team.
-
Do one of the following:
-
Hold your pointer on the user to remove and click the Delete icon: the Remove user dialog opens.

-
Select one or multiple users to remove by selecting the related checkbox. Then, click Remove users: the Remove user dialog opens.

-
-
Click Remove user.